BARN QUILT INSTRUCTIONS
by John Elberfeld, co-founder of Helderberg Quilt Barn Trail, 2014
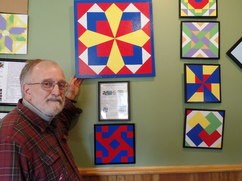
A "barn quilt" is a quilt pattern painted onto plywood and attached to the side of a barn, garage, store, or wherever it will fit. When several people in an area put up barn quilts, they often publish routes or "quilt barn trails" so visitors can admire all the works of art. Some trails are meant to attract tourists and money to local businesses, while other trails are mainly a way to share the beauty of an area.
Barn quilts are usually squares. The standard size is 8'x 8' made up of two 4' x 8' sheets of special plywood. Smaller squares may be required, depending on the space you have.

When my wife and I lived in Knox, Albany County, NY, a neighboring county had an established quilt barn trail, Schoharie County Quilt Barn Trail (scquiltbarntrail.wixsite.com/scqbt), which inspired my wife to want a barn quilt on our garage. Since I am retired, my wife also "volunteered" me to help a small business in the next town build a barn quilt to attract people to their country store. Below are some of the things I learned in the process of constructing the barn quilts.
Getting a Barn Quilt
The Helderberg Quilt Barn Trail organizers hope that individuals in the Hilltowns will design and create their own barn quilts. Complete instructions are given below. NOTE: Prices quoted below are from 2014.
An Internet search will help you find barn quilt suppliers. We strongly suggest that you make sure the barn quilt is made for durability as well as beauty. Look for three coats of primer and two or three coats of each color of paint. Many suppliers sell barn quilts up to 4'x4' so they are able to ship them. One supplier of traditional quilt designs is Black Rooster Creative out of Trenton, MO.
Getting Started - How to Make a Barn Quilt
First, there is no right or wrong way to build a barn quilt, although many Internet sites have detailed instructions and declare their approach is the only acceptable way. Each site offers slightly, and sometimes hugely different advice, but all are convinced their way is best. Do what seems logical for you and your skill level.
Hardware List (Typical purchases)
2 of ½"x4'x8' MDO plywood signboard $99.36
7 of 2"x4"x8' pressure treated board $33.95
2 Boxes Deck Screws (1 3/4", 3 1/2") $15.00
Exterior Spackle/Filler (Sand/paint) $5.00
Yellow 1.5 inch Frog Masking Tape $10.50
4 of Trim 3" roller and tray $11.96
1 of 9" roller $2.46
1 of tray liner for large roller $1.19
Small detail brush set $2.99
2 of 6' slotted angle iron (mounting) $30.00
Paint List
Primer (Kilz Premium Latex) 2 gal $50.00
5 quarts Exterior Latex paint $90.00 (More if using more colors, much will be left over)
Reusable Hardware (Cost varies depending on quality)
Drill bits for screws $3.00
Counter sink drill bit $3.00
Yard Sticks $2.00
Tape Measure $8.00
Paint Tray + Liners $6.00
9" Roller Handle $5.00
Wall paper roller $6.00
Putty knife (flexible) $7.00
Saw Horse Brackets (4 pairs) $28.00
2x4s for sawhorses (9 of 8') $25.00
Glad Entrée Sealable Plastic (2 sets) $6.00
Power Equipment
Electric Drill $40.00
Electric Saw $50.00
If you are doing more than one quilt, a 4 foot T-square used by drywall (sheetrock) installers is extremely useful.
You may already have many of the supplies mention above on hand.
Primer: Use the best primer you can buy. It will take at least a gallon for an 8' x 8' barn quilt. I use Kilz Premium latex. I prime the 2x4 frame and both sides of the MDO board with 3 full coats of primer, making sure I prime the edges of the sign board with heavy coats. Expect to pay $25 per gallon for primer. You will probably need to buy a second gallon.
Color Paint: Use the best exterior latex paint you can find. I have used Benjamin Moore and Clark and Kensington with good results. AVOID Rust-Oleum exterior latex. Premixed Rust-Oleum colors are beautiful, but the paint cracks within three weeks when painted on KILZ primer. Initially I used high-gloss paint, but the reflections in the sun can be blinding. Now I use semi-gloss. Mixed paint can cost $18 per quart or more. Most barn quilts have at least 3 colors, so plan on spending at least $60 for paint. You will probably have about $40 worth of paint left over for future projects. Every part of the design receives three (3) full coats of color paint.
Details on Materials
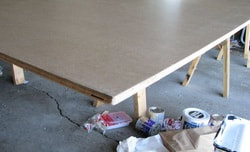
I am using MDO Sign Board. This is exterior 1/2" thick plywood with one side that is extremely smooth and covered with a special paper. The back of the MDO [medium-density overlay] Sign Board is rough. In my area, the boards are available at Cobleskill Agway and 84 Lumber for about $50 for a 4'x8' sheet. The big box hardware stores have never heard of it. If you can't get MDO Sign Board in your area, get the best 1/2" exterior plywood possible with one side smooth. (Marine plywood is mentioned on several sites.) Thicker exterior plywood is just too heavy to handle unless you have lots of help on hand. Two sets of saw horses are needed as you will work on the 4'x8' sheets separately.
Framing the Back
You will need seven (7) 8-foot 2x4s, pressure treated, to make a frame for the back of an 8' x 8' barn quilts. For smaller quilts I rip the 2" x 4" into two 2" x 2" boards, 8' long. In spite of their name, the 2x4 boards are about 1+1/2" by 3+1/2". Don't assume they are exactly 8 feet long; mine were 1/4" to 1/2" longer than 8 feet. Also, the sign board may be a tad longer than 8 feet. It may not sound like much, but that difference is HUGE when you see the final frame on the back of the barn quilt. The 2x4s were $4.85 each plus tax.
I also bought some 3+1/2 " screws to hold the frame together. In the "old" days, screws were either flat head or Phillips head, but now they come with all kinds of heads. Make sure the driver is in the box, or buy one that fits the screws. I learned square head drivers come in several sizes, and the wrong size can strip the head of the screw. The screws cost $7.49 for a small 1 pound box
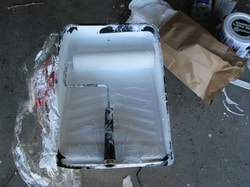
Painting Tips
To prime the sign board and 2x4s, I used a short nap 9" roller. To keep the paint fresh between coats, I cover the roller and paint tray tightly with two overlapping pieces of plastic wrap to keep the paint and roller from drying out.
The smallest dribble of paint can be very visible on the finished barn quilt, so take care.
The colors you use on the square should be bold and beautiful. Subtle variations of pastels that look great up close blend into a bland gray at a distance. Remember, most of the viewers of a typical barn quit will be driving by at 50 miles per hour (depending on your road) and will have just a few seconds to admire your work. You need colors and patterns that stand out to grab their attention. Beautifully crafted intricate works of art will be passed by with just a quick, unappreciative glance. Of course, if the barn quilt is at the front entrance of a store where people can stop to admire it, you'll have a wider choice of color shades and details.
Because most of the blocks are large, I decided to try 3" rollers for painting in the colors. They make painting fast and easy. I found it more expensive but worth it to have a different set of roller, handle, and tray for each color. I "borrowed" some Glad disposable plastic Entree containers from the kitchen, then bought my own. They have air-tight lids that keep the paint and roller fresh and ready to use for a long time. I learned to put a strip of painters tape across one end of the tray to support the roller handle to keep it clean and out of the paint.
Some roller sets are sold in plastic that can be used as a tray.
Some roller sets are sold in plastic that can be used as a tray.
START THE BARN QUILT CONSTRUCTION
Rip the 2x4s if needed
If you are making a 4' x 4' or smaller barn quilt, you can split the 2x4 up the middle. The lighter frame is still strong enough for the smaller sizes. I keep the full 2x4 for a 6'x6' or 8' x8' barn quilt.
Rip the 2x4s if needed
If you are making a 4' x 4' or smaller barn quilt, you can split the 2x4 up the middle. The lighter frame is still strong enough for the smaller sizes. I keep the full 2x4 for a 6'x6' or 8' x8' barn quilt.

Prime the 2x4s
I've tried several methods of constructing a barn quilt. These directions are quite different from those I posted a year ago. The method that has worked best for me begins with priming all the 2x4s that will be used in the frame with three coats of primer. I wait to cut them to right length later, so the ends will need to be primed.
I've tried several methods of constructing a barn quilt. These directions are quite different from those I posted a year ago. The method that has worked best for me begins with priming all the 2x4s that will be used in the frame with three coats of primer. I wait to cut them to right length later, so the ends will need to be primed.
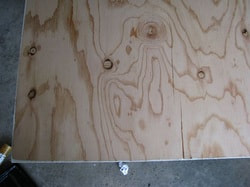
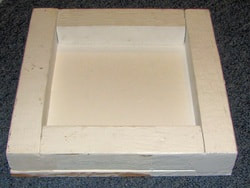
Prime the back side (rough side) of the sign board
Use three coats of top quality primer on the back (rough) side of the board. I do not try to prime the edges at this point as the paint tends to run onto the front of the board and form ridges. If you are making a 6'x6' or 8'x8' barn quilt, you will create each half separately. They will not be joined until the end, so you can reach across and paint each board as you're working.
Use three coats of top quality primer on the back (rough) side of the board. I do not try to prime the edges at this point as the paint tends to run onto the front of the board and form ridges. If you are making a 6'x6' or 8'x8' barn quilt, you will create each half separately. They will not be joined until the end, so you can reach across and paint each board as you're working.
Cut the frame pieces
Turn the sign board so the rough side is down and the unprimed, flat side is up. This protects the flat surface. Measure and cut the frame pieces carefully and accurately. If you rip the 2x4s in half lengthwise to make 2x2 strips, turn them so the cut side is toward the inside.
Measure rather than compute the proper lengths. Cutting an 8-foot 2x4 in half will NOT produce two 4' pieces. Measure every piece. An 8' board might be 8' + 1/2". MEASURE!
Use two 3+1/2" screws to hold the pieces of the frame together at every junction. Countersink, fill, and prime the screw holes in the frame pieces.

Attach the frame pieces to the back
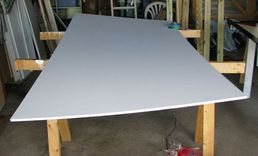
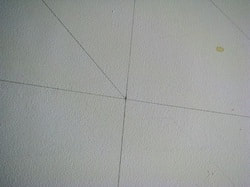
Place the frame pieces under the sign board with the good, unprimed side up. If you are framing a full 4' x 8' sheet, you will need a center cross piece, like the dotted line in this picture.
Place the frame pieces under the sign board with the good, unprimed side up. If you are framing a full 4' x 8' sheet, you will need a center cross piece, like the dotted line in this picture.
Screw the MDO sheet onto the frame. I use 1+3/4" screws every 12" along every edge and across the center piece. Countersink the drill holes so the head of the screw is below the surface of the sign board.
Most 2x4s have a curve to them, so you may have to push or pull the 2x4 to make a frame that fits the sign board.
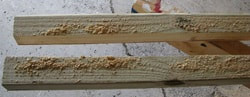
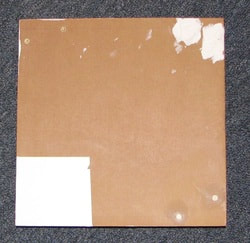
Apply a liberal coat of exterior, paintable wood fill to each hole. Sand it with a power sander until just the wood fill in the hole is visible. It may take two applications of the fill to get rid of a dimple in the center of the hole. When primed, the holes virtually disappear. They will be invisible when painted with colored paint. However, if not sanded down to the board level, the wood putty lump will be highly visible on your finished product. See how it's done below.
Most 2x4s have a curve to them, so you may have to push or pull the 2x4 to make a frame that fits the sign board.
Apply a liberal coat of exterior, paintable wood fill to each hole. Sand it with a power sander until just the wood fill in the hole is visible. It may take two applications of the fill to get rid of a dimple in the center of the hole. When primed, the holes virtually disappear. They will be invisible when painted with colored paint. However, if not sanded down to the board level, the wood putty lump will be highly visible on your finished product. See how it's done below.
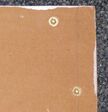
Screw holes
|

Wood fill
|
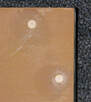
Holes sanded
|
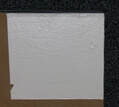
Board primed
|
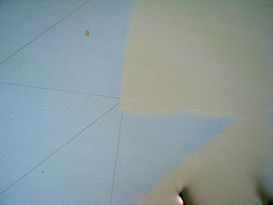
Prime the front and side of the sign board
Apply three coats of top quality primer to the good face and sides of the sign board. Touch up the frame pieces. You will need to prime the cut ends of the frame pieces and the filled holes in the frame pieces. Any imperfection--paint splotch, sanding dust--tends to be visible in the finished product.
Pay close attention to the edges of the sign board. They are the weak spot and must be completely sealed with primer.
Before you drive yourself crazy with imperfections, keep in mind most viewers of barn quilts will be traveling 50 miles an hour and will be hundreds of feet from the quilt.

Pencil in the border
The first element of the quilt design you pencil in is the border. For my quilts, I often have a border painted around the edges. This is painted last. The border is 1" for 4'x4' barn quilts, 1+1/2" for 6'x6' and 8'x8' quilts. The border helps to keep the quilt design from blending into the background. This border is not required if the quilt colors stand out from the building the barn quilt is mounted on.
The visible sides of the frame pieces are also painted the same color as the border to produce a finished look to the quilt.
Some sites recommend screwing a 1"x4" board around the quilt for a frame to create a separate, physical border. I don't do this because this board is not external, pressure treated wood and is not really needed to protect the quilt. However, if it seems like a good idea to you, go ahead.

Study the geometry of your design
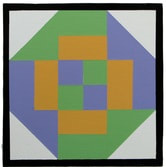
Most traditional quilt patterns are geometric, with 2, 3, 4, 5, 6, or 7 squares on a side. The pattern on the left has two squares on a side, for example. The deep purple triangle is one-half of a square divided along the diagonal. The pink and green triangles are made by drawing the other diagonal through each square, but stopping when it hits the purple colored triangle.
Most traditional quilt patterns are geometric, with 2, 3, 4, 5, 6, or 7 squares on a side. The pattern on the left has two squares on a side, for example. The deep purple triangle is one-half of a square divided along the diagonal. The pink and green triangles are made by drawing the other diagonal through each square, but stopping when it hits the purple colored triangle.
Another pattern analysis
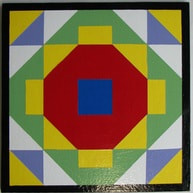
This design has three squares on a side for a total of nine squares. The corner squares a divided along the diagonal. The center edge squares are divided in half with a line parallel to the edge. The center square is divided into horizontal and vertical halves, forming four small squares. The appearance of this simple pattern can change dramatically if you choose different colors placed in different sections of the design.
This design has three squares on a side for a total of nine squares. The corner squares a divided along the diagonal. The center edge squares are divided in half with a line parallel to the edge. The center square is divided into horizontal and vertical halves, forming four small squares. The appearance of this simple pattern can change dramatically if you choose different colors placed in different sections of the design.
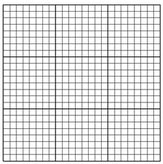
Transfer your design to graph paper
Once you understand the geometry of your design, you can start the process of drawing the design on graph paper. The downloadable, printable, quilt pattern grids available on this site give you a helpful starting point for transferring your quilt design to graph paper.
Patterns with compass points (sharp angles), circles, or free-hand art will require some calculations and more effort, but having a working illustration on graph paper is worth the effort.
Dimensions and Scale
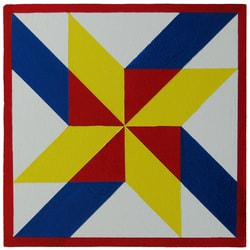
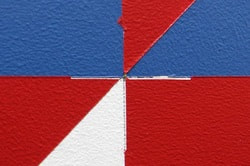
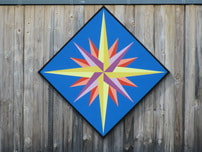
The pattern to the left is just four blocks on a side, for a total of 16 blocks. Each block is cut along a diagonal. The choice of colors used to fill each triangle formed by the diagonals gives the illusions of a pinwheel, a star, and stripes.
If you were making this on an 8'x8' barn quilt, and the border were 2 inches, you would have just 92 Inches (96 - 2- 2) for the actual pattern. Each square be 92/4 = 23 inches on a side. A border of 1 1/2 inches leaves you with 93 inches for the pattern. Each block would be 93/4 = 23 1/4 inch wide.
Pencil in the design
Use very light pencil on the primed face of the barn quilt. Some colors have trouble covering dark pencil lines. Mark the location of the squares on the border, but do NOT draw every square. Just draw in the borders of the painted figures. A 4' ruler is VERY helpful. I always use at least three marks to draw a straight line to make sure all my measurements are accurate, even if I'm using the drywall T-square.
As they're sewing, quilters often mark their blocks, rows, and columns by pinning notes on them so the quilt blocks don't get out of order. Following your design on graph paper, use scraps of painters tape or Post-It notes directly on your MDO board to mark the color of each section. Doing this has saved me many a headache.
Paint the lightest colors first
Rather than tape the first colors, I just paint over the lines with the lightest colors first--not a lot, but enough to be sure the design area is completely covered. Apply at least three coats of each color to make the board completely waterproof and ready to face the sun, wind and rain for many years.
Some colors, like red, have a hard time covering other colors, so some reds need to be painted first. Experiment on wood scraps if you're not sure.
If you redraw the lines over a finished surface, keep in mind that almost all washable, non-permanent, easily removed pencils, crayons, and pens will leave a fairly permanent mark. A very light pencil can be removed with a damp cloth. Scrubbing and erasing a line can mar the surface of the finished color. Try to arrange any new lines so they are painted over by the next color applied to the barn quilt.
Tape, paint, wait... repeat
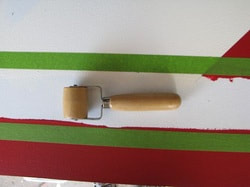
Tape over the edges of the light colored paint. I use YELLOW Frog tape. From the pictures, you can tell I've tried other tapes. I prefer 1+1/2" as it gives a little more protection. Some people prefer 3M blue tape, green Frog tape... use whatever works best for you.
Once the tape is in place, I press it down by hand, and then go over the edges with a wall paper roller. The next step is CRITICAL. Paint along the entire edge of the tape with the light colored paint that the tape is covering. Paint will almost always bleed under the tape. This way, what bleeds under the tape is the SAME color as the paint under the tape. This step seals the edge of the tape and prevents the newly applied, darker color from bleeding under the tape. This step takes a while, but will save hours of touch-up work.
Be sure to let each coat of paint dry. Depending on the weather, humidity, type of paint, etc., this may take two to four hours, or longer. You've heard the expression "Watching paint dry..."
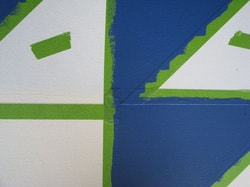
Angles
I use a very sharp razor knife and straight edges help trim very precise angles. The narrower the point, the greater the challenge to get things to look good. Also, be careful when pulling up the tape covering a narrow point. Sometimes the paint will stick to the tape and peel back.
I use a very sharp razor knife and straight edges help trim very precise angles. The narrower the point, the greater the challenge to get things to look good. Also, be careful when pulling up the tape covering a narrow point. Sometimes the paint will stick to the tape and peel back.
Touch-up
No matter how hard I try, I still have places that need touching up. That's what the set of small paint brushes is for. Experience will cut down on the number of spots, but they will still be there unless you stick to the simplest designs.
No matter how hard I try, I still have places that need touching up. That's what the set of small paint brushes is for. Experience will cut down on the number of spots, but they will still be there unless you stick to the simplest designs.
Protective Coatings
I don't add a protective coating, as exterior latex house paint is meant to survive the elements and breathe with the plywood. Other experts use a coating, but warn that some coatings add a yellow tinge to everything.
I don't add a protective coating, as exterior latex house paint is meant to survive the elements and breathe with the plywood. Other experts use a coating, but warn that some coatings add a yellow tinge to everything.
Installing the barn quilt
The following suggestions are based on my experience with hanging more than 10 barn quilts. They may or may not work in your particular situation.
I line up the two halves of the quilt and hold them together with big C-Clamps. When everything is lined up--the top is as smooth as possible and the patterns match as well as possible--I drill holes through the two frames for 4" bolts. I use 1/4" carriage bolts with washers. I use 1/4" drill bit for the hole, but the first hole is too small, so I go in and out several times with the drill bit to make the hole a tiny bit larger. I do some touch-up work to match up the patterns where the two halves meet.I can then take the boards apart for transport.
The two 4'x8' halves of the barn quilt can be transported individually to the installation site. When the two frames are joined for the installation, the two halves should match up if the installers use the nuts and bolts you supply, and use the holes you drilled in the two frames.
The finished quilt can weigh well over 100 pounds. Some sites recommend the use of bolts through the frame into the support beams of the barn, but this will make major holes in the finished surface of your barn quilt. It is also difficult to locate the support beams Defacing my final product does not appeal to me.
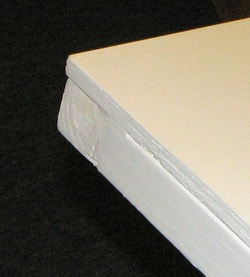
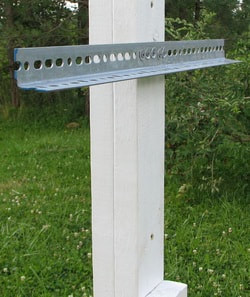
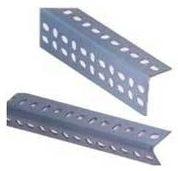
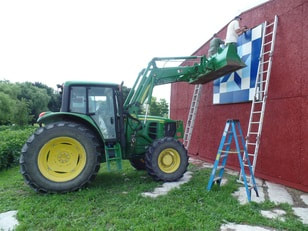
I prefer to place very heavy duty right angle brackets (slotted angle irons) on the barn at the top and bottom. Most hardware and supply stores have them for approximately $20 for a 6' heavy duty angle bracket that is at least1 1/2" wide. Sometimes you can get an angle iron that is 2 to 3 inches wide. (See photo below.) Tractor Supply Company has angle irons at a better price than hardware stores. I use smaller right angle brackets on the sides. It is easier to center, level, and screw the slotted brackets into support beams BEFORE mounting the barn quilt than to position bolts in a barn quilt while it's hanging from a pulley or cherry picker.
If you are mounting the barn quilt on a barn or house that has clapboard siding or an uneven surface, you will need to use wood slats (shims) behind the angle iron to move it out far enough from the house so the barn quilt can fit snugly into the angle iron without squashing the siding. I use 3 1/2" or 4" screws to mount the bracket to support beams. Shorter screws can be used, depending on the siding construction. I use 1 3/4" with a washer to screw the angle iron to the frame. Longer screws are a waste, and longer screws usually do not have threads to grab the wood along the entire length of the screw.
Once the barn quilt is resting on the bottom bracket, someone needs to keep it from falling forward while you screw the top and bottom brackets to the frame.
You can paint the exposed surface of the brackets the same color as the border of the quilt so the support system effectively disappears.
Once the barn quilt is resting on the bottom bracket, someone needs to keep it from falling forward while you screw the top and bottom brackets to the frame.
You can paint the exposed surface of the brackets the same color as the border of the quilt so the support system effectively disappears.
|
|
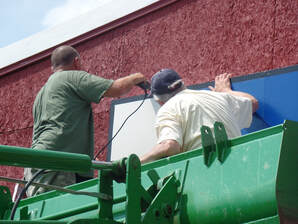
For the above installation, an 8' bucket lifted the quilt into place. Three people helped to slide the quilt off the bucket onto the preinstalled angle iron that had been securely bolted to the barn. This time the top angle iron was preinstalled onto the top of the barn quilt. The top bracket should be a little more that 8' above the bottom bracket so you can swing the top into place. You can use a level, but if the siding is not level, a barn quilt that is level looks crooked. Once the quilt was on the bottom bracket, a screw (with washer) was put through the top bracket to keep the quilt from falling forward. Once the quilt was safe from falling on top of the workers, much bigger lag screws were screwed through holes in the brackets to secure the quilt to the barn. The whole process took less than an hour because most of the hard work (positioning and securing the brackets) was done beforehand. This was a very hot July day--the white stuff on the ground is bare rock, not snow.
Diagonal Mounting
To mount the barn quilt on point, you need two angle irons that meet to form a "V" that the quilt can rest on. The two angle irons must meet at a 90 degree right angle and form a 45 degree angle with the horizontal. Do this at the top and bottom.
To mount the barn quilt on point, you need two angle irons that meet to form a "V" that the quilt can rest on. The two angle irons must meet at a 90 degree right angle and form a 45 degree angle with the horizontal. Do this at the top and bottom.

Special equipment and lots of help may be needed if the location of the quilt is especially challenging. It can be very difficult to lift the barn quilt into place without damaging the face of it. Always keep some paint for touch-up.
Double ladders, pulleys, staging, cherry pickers, tractors with bucket loaders.. the list of useful equipment is endless. Once the installation is over, you can
Step back and enjoy your work!
Double ladders, pulleys, staging, cherry pickers, tractors with bucket loaders.. the list of useful equipment is endless. Once the installation is over, you can
Step back and enjoy your work!
